We are ready to start fitting out trousers. And I’m about to post some very unflattering pictures of myself (tiny bit uncomfortable here!)
If you’ve only just joined this Trouser Fit-along, go back and read the first posts (Here, here and here. I am using my e-book pattern Winnie Wide Legged Trousers for this fit-along, but you are welcome to use any trouser pattern for woven non-stretch fabric you’d like (just to clarify – you can totally use stretch wovens for your trousers, as long as the pattern is not drafted for stretch fabric only).
We’ve assembled the pattern pieces for front and back, corrected any crotch curve differences and traced the pattern pieces onto soft tissue tracing paper, which we’ve cut out with a lot of room around the pattern pieces. We have also clipped curves and taped to reinforce the tissue. Now we are ready to try on the tissue for length and width. Oh by the way. I cut the hem at the hemline for fitting, then add tissue paper for the hem allowance later. It makes it easier to establish the right length of the trousers, I think.
Pin the front and back together at the side seam and the inseam, with pins vertical and about 5 cm apart. Also pin the dart (we’ll fit it to fit you later, but for now, just go with the one on the pattern). Get a piece of elastic (around 1 cm wide. Mine is 1.5 cm) and tie it around your abdomen, at the point of your bellybutton.
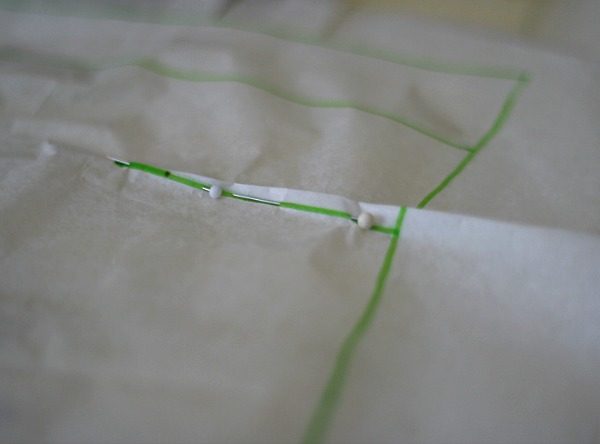
The back dart is pinned. We’ll fit it to the body later, but for now, just use the one in the pattern!
Now. Get your hand mirror and/or your digital camera, stand in front of a mirror and put on the tissue, very carefully. You don’t want to rip the tissue. (but if it happens, take the tissue off your body, unpin to make it lay flat and tape the rip.)
Now evaluate the width of the pattern. (use your hand mirror to stand back to your full size mirror and use the hand mirror to see how the back looks – or use a camera. Or both). Does your pattern CF and CB reach your centre front (bellybutton) and centre back (spine) ? If not, you’ll need to adjust at the side seams to make it wide enough – or if it overlaps, take in the side seams top make it narrow enough!
You can unpin the pattern while you wear it and replace the pins to mark where you want the new side seam, but you need to take the pattern off, mark with a marker (in a different colour than the one you used to trace the pattern), unpin the side seams and lay it flat to repin. You might want to iron the pattern pieces carefully to make sure they are flat.(I always tape on the right side of the pattern piece and iron on the wrong side – so I don’t melt the tape!)
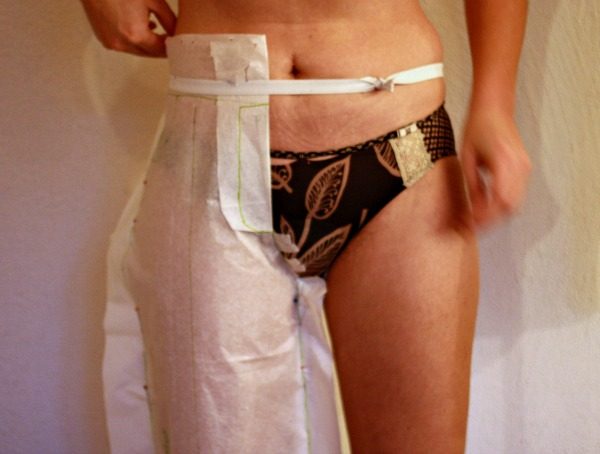
The Centre Front of the pattern doesn’t reach my centre front at all. I need to add to the side seams at the waist (I always do – so I leave a lot of tissue there to work with)
Repeat until pattern reaches your centre front and centre back. You might need to add more to the back side seam than to the front side seam or the other way around. Look in your mirror from the side to make sure that the side seam is straight vertically and is centred at your side.
Now let’s check the crotch lengths. I placed the elastic to be at the waistline of the pattern at the sides, and then realized that I still need to add some length to both front and back. Since it was such a small amount, I simply added it to the top, then tapered to the original waistline seam at the sides. Now is a good time to change the waistline, by the way, if you want the trousers to sit lower or higher. You decide. Just remember that the waistband will be added to the height of the trousers.
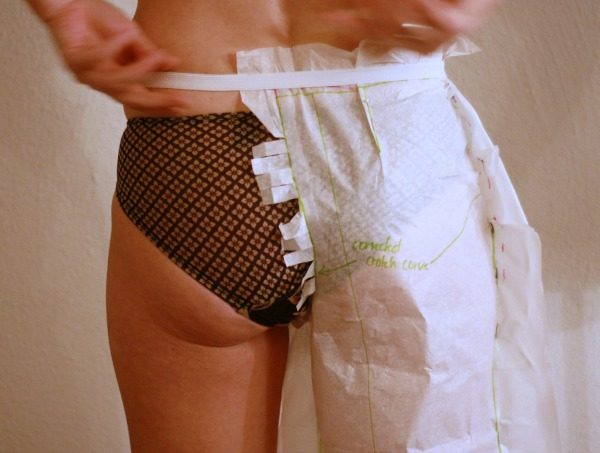
You can see I’ve had to add a little more length at Centre Back (the pink lines). Also it’s obvious that I have some wrinkles where my protruding bottom is pushing the tissue. We’ll deal with that next!
That’s it for this post.
In the next post, we’ll have a look at dart fitting, baggy stuff and inseams.




Hello,
I started a little late here, and then the holidays came etc. Have you addressed any fitting issues yet? I’m having problems with the waist/waistband being too high. Can I just cut off an inch off the top of the front and back pattern pieces? I don’t like doing tissue fitting so I’m doing it in a muslin. I find that I just rip the heck out of the pattern. I will post a pic on the flickr group too.
Hi Jill
I’ve only adressed crotch curve things + the baggy seat until now. And length. You can totally cut off an inch of the top of the waist at front and back. You might need to adjust the waistband a bit, then, and also maybe just move the pocket down. Remember that the pocket facing of the trousers (If you are making my pattern, if not, please ignore) is also a part of the front piece.
I will resume the rest of the fit-along next week.
Happy New Year!
Thanks so much! Look forward to more posts!